
There is a great difficulty in finding any information on the web about traditional broomaking tecniques. I hope this site will help to rectify that situation. Currently I am employed as broomaker at Historic Cold Spring Village, nineteenth century working village located just north of Cape May, NJ. In the Village we demonstrate some of the crafts that were practiced in the 19th century here in Cape May County, NJ. Among these are Tinsmithing, blacksmithing, ropemaking, domestic arts, Printing, bookbinding, innkeeping, traditional farming tecniques, weaving, spinning, and of course broommaking. For a tour of the Village, please see "The sights of 19th century Living"
The peacock above was taken from a broomakers label form the 19th century and I use it for both my business cards and as a label for my brooms.
The Village offers educational programs for students and the public.
This is the Corson Gandy Barn, which is the Broom barn at Historic Cold Spring Village...(it's where I work)
Handmade brooms are available at the Country Store in Cold Spring Village, Rt # 9, Cold Spring, NJ...There are plenty of other crafts available there also...We are open memorial day through Labor day, with special events off season!
Stick for the handle; diameter one inch (1")...I use branches from trees that I have removed the bark from with a shaving horse and draw knife. a good supply of broomcorn, (broom corn is difficult to obtain, I get mine form R.E. Caddy inc. out of Greensboro, NC.) Four to five yards (4-5 yds.) strong twine (I use waxed jute, available from R.E. Caddy) One long, large eyed needle or wire. (A sailmakers needle is ideal, you can find those in some Yachting supply stores, I think R.E. Caddy carries them also) One three quarter inch (3/4") nail (or drill) Eighteen inch (18") piece of twine tied to form tie-off loop Six feet (6') of twine, cut into two foot lengths Hammer, Tying block, Sharp knife
Gather your materials. Make a 'tying block' by whittling the middle of a foot long, (12") (very straight and smooth) limb.
Start by preparing the handle. Drive the nail or drill a three quarter inch (3/4") hole through the handle, some three inches (3") from where the broomcorn will be attached to the handle. Fasten the twine to this nail or hole. Wrap the other end of the twine around the centre of the tying block, leaving a few feet of twine stretched between the block and the handle.
Traditional besoms had a 'knob' on the broomcorn end. Broomcorn has three sections: stalks, brush and knurl. (The knurl is the junction between the stalk and brush.) Trim the stalks to six inch (6") lengths. Place the broomcorn, (stalk down) into hot water, covering both the stalks and knurls. Let soak for 1/2 hour Remove the broomcorn from the water, drain off the water. Place the tying block on the floor.
Place your feet on the tying block and pull the twine taut. (Use both hands on the handle.)
Place a stalk of broomcorn next to the handle, next to the nail or drilled hole. (Have the knurl directly under the twine.) Twist the handle so that the twine binds the broomcorn to the handle. Pull rather hard, so that the twine forms a V-shaped depression in the stalk of the broomcorn.
Roll the handle back slightly. Place a second stalk of broomcorn next to the first one. Twist to bind both stalks with the twine. Pull to for a V-shaped depression. Continue with the broomcorns, until you have covered the handle. Be sure to use an odd number of stalks, so that the weaving will come out properly.
After all of the stalks are bound to the handle, pull and wrap the twine around the stalks 3 times.
Begin the weaving of the stalks by placing your thumb on the twine and releasing pressure on the tying block. Raise one stalk, run the twine under it. Skip the next stalk and run the twine under the stalk after that. Remember to pull the twine taut. Contine all the way around, and as far up the stalks as you desire. (Leave an inch or so, to turn under.)
With the eighteen inch (18") long piece of twine, fashion a 'tie-off loop'. Do this by tying the ends together.
If you are going to turn under the stalk ends, do it now. To tie off the twine, place the tye-off loop next to the last stalk that the twine went under. Turn and wrap the stalks five more times, being sure to go over the loop, leaving the loop end free, Use your thumb to maintain pressure on the twine. Cut the twine loose from the tye-off block, about six inches (6") from the broom. Thread the cut twine through the tye-off loop. Pull the loop to bring the twine end under wraps on the broom, and to pull the tye-off loop free.
If you did not turn under the stalk ends, take the knife and trim the stalks to about a quarter inch above the twine.
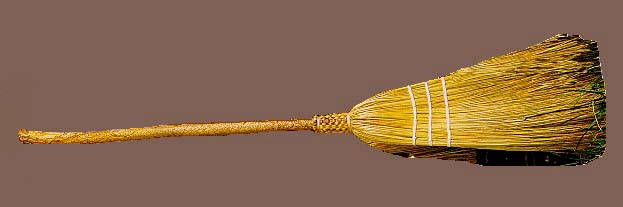
To make the 'spread', wrap twine, about midway around the brush, four times. Do not pull too taut. Do this again, about an inch above, and then a third one, an inch above that.
Thread the large eyed needle with a length of twine. (You can make a 'needle' out of a length of wire, looped at one end.)
Knot the free end to the top 'spread'. Thread the needle through the brush (about an inch from the edge, pass it over the front spreader twine, go over the broom three quarters of an inch, and thread the needle back through. Do it on both sides. At the end, reverse and do the same going the opposite direction. (Forming X stitches.)
Tie off. Do the other two spreaders the same way.
Broommaking supplies:
For more info e-mail Bob the Broomaker!